Photography Tips From Engearment’s Own – Evan Green
The scenes that unfold in the mountains are often breathtaking and awe inspiring. Capturing these moments and trying to do them justice is what inspired me to dig deeper into the world of photography. Over the years I have learned a lot about what to do and not to do in order to get the perfect shot. These five tips will help to improve your outdoor photography whether you’re on an iPhone or an EOS R.

#1 Change your perspective
Most people see something interesting, pull out their camera, and then snap a photo wherever they’re standing. Sometimes these snapshots turn out great, but often times they end up looking bland. The human brain naturally tends to focus on the interesting subject matter and cuts out the boring elements, for instance your nose is always in your field of view. To improve your photos, think about what caught your eye, what is that your brain is focusing on? Then move your camera around to find a view that emphasizes your subject. Using timeless art concepts such as the rule of thirds, the color wheel, leading lines, and symmetry will further improve your composition skills and force you to slow down and evaluate before pressing the shutter.

#2 Add Depth
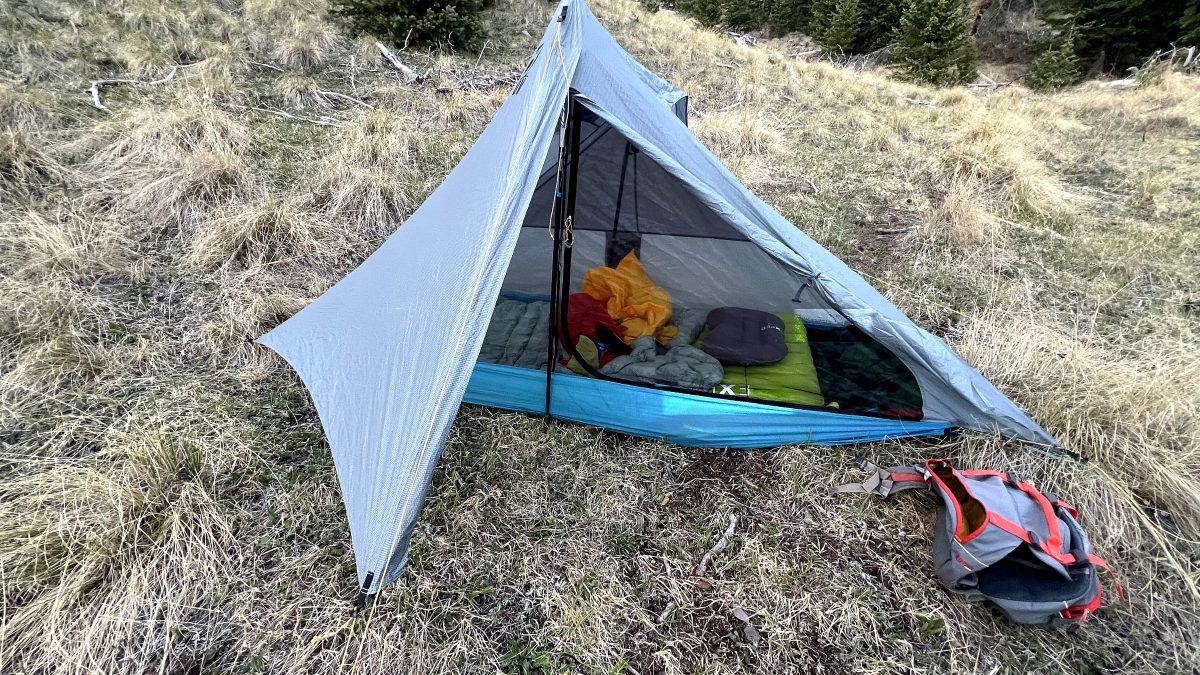
Adding depth to photos by using environmental elements is one of my favorite techniques. Including something in the foreground is easy to do and creates a 3-D pop effect in the image. In the backcountry try placing tree branches, flowers, or rocks right in front of your lens to shoot through. Not only does this create a blurred foreground element, but it also adds to the storytelling by providing additional context that helps the viewer to feel like they are really there. Foreground objects are also useful in “framing” your subject by boxing them in to draw the viewer’s attention and set the scene. Outdoor gear is also very useful when adding depth. For example a mountain sunrise shot is beautiful, but a shot of the mountains at sunrise framed through an open tent door adds a whole new layer to the image. Finding these objects and frames to incorporate into a shot really unleashes your creativity, give it a try!

#3 Edit more
A common misconception is that pictures must be perfectly captured and that any editing is cheating. However, this is simply not the case. Editing is part of the art form. Even Ansel Adams was known for his dodging and burning work, albeit in the actual dark room and not Lightroom. Simple edits like cropping, straightening the horizon, and experimenting with black and white can quickly help improve your image. Digital files hold a ton of information waiting to be unleashed, you can be amazed by the amount of detail you can bring back from the shadows or the richness of the colors in a landscape. The Adobe Lightroom app is a free and powerful tool I recommend for processing images and organizing your best shots.


#4 Follow the light
At its very core, photography is just the act of capturing light. Notice how many amazing shots are taken near sunset or sunrise. Or that most photographers always recommend shooting during the “golden hour”. The soft yet dramatic light that occurs as the days transition is flattering on both people and landscapes. Overnight camping trips are a great time to shoot as spending the full day outside makes it much easier to find yourself in the right spot at the right time when Mother Nature puts on a light show. But don’t limit your shooting to just the prime hours near sunrise and sunset. Learning incorporate artistic sun flares during high noon or capturing the stars at midnight will give you the skills to make any time of day look great.

The dramatic golden light during sunrise creates much more compelling images than the harsh noon sun
#5 Keep learning
Simply put, YouTube is a fantastic resource. I personally find that even the fundamentals of photography, such as shutter speed, aperture, iso, can be confusing. But free online tutorials can quickly speed up the learning process with great information and visuals, plus you can easily watch several different takes on the same topic to help it really sink in. If you commit to learning one new photography or editing technique per month then one year later you have 12 tools to utilize for taking your photography to the next level!
But this wouldn’t be an Engearment post without talking about gear!
A budget camera recommendation I suggest is the Sony A3000. If you’re looking to push past the limits of your phone and enter the world of interchangeable lens cameras, the A3000 is a great option that can usually be found for under $200 (tip: check the used section on Amazon). I will admit my bias as I have been shooting primarily on the Sony Alpha system for the past few years, however Sony currently makes the Top 3 selling cameras on the market today (A6400, A7III, and A6000) so I am not alone in my love for these cameras.


Why do I love it? The lightweight mirrorless technology paired with a 20.1 megapixel aps-c sensor performs way above its price range, making it a perfect match for mountain adventures. Where’s the catch? Well the camera is mostly made out of cheap feeling plastic and doesn’t feature all of the latest tech like eye autofocus or wireless photo transfers. But the money saved can be put towards the other half of the equation for a great photography setup; a quality lens!


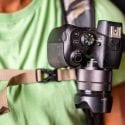
Another item that I find invaluable when photographing in the mountains is the Peak Design Capture clip. This system allows you to easily attach your camera to any backpack strap or belt. When I first got started shooting I was worried about damaging my camera so I would keep it in a protective pouch inside of my pack. This setup caused me to rarely take photos because I did not want to deal with the hassle of taking my pack off, digging around for the camera, and then putting in away before moving on.
The Peak Design clip provides easy quick release access to the camera right at your fingertips so you never have an excuse to miss the perfect shot. Moving the camera to the outside of the bag also frees up space for other critical gear. I have used this clip during ski touring, mountain biking, and alpine climbing for years with no accidental releases or drops of my gear (the same cannot be said for the cheap ebay knockoff I started with).

Peak Design has continued to update this masterpiece and the latest V3 model of the Capture clip is even smaller, lighter, and easier to use than it predecessor. I initially thought this chunk of metal was overpriced but it has since proven to be one of the most valuable and durable pieces of my kit. The only downside I have found is that the mounting bracket can become uncomfortable after 5 or 6 miles with a heavy pack on.
Have your own tips or looking for more gear recommendations? Leave a comment below!
Evan Green
Since moving to Colorado in 2014 he has become an avid splitboarder, mountain biker, climber, backpacker, and mountaineer.

When not working at his full-time job as a geologist Evan can usually be found exploring a new peak or pursuing his passion for adventure photography.


Leave a Reply