
Erin Trail
1UP Rack Stash Bike Hanging System Detailed Review
My husband and I were looking for a garage bike storage solution and were really excited to build and review the 1UP RS Slide system. We are both avid bike riders and needed a way to better organize our fleet. Utilizing a hanging storage system seemed like the most space efficient option, using wall space for storage while leaving the garage floor space for our cars and other garage things.
The details for our 1Up Build:
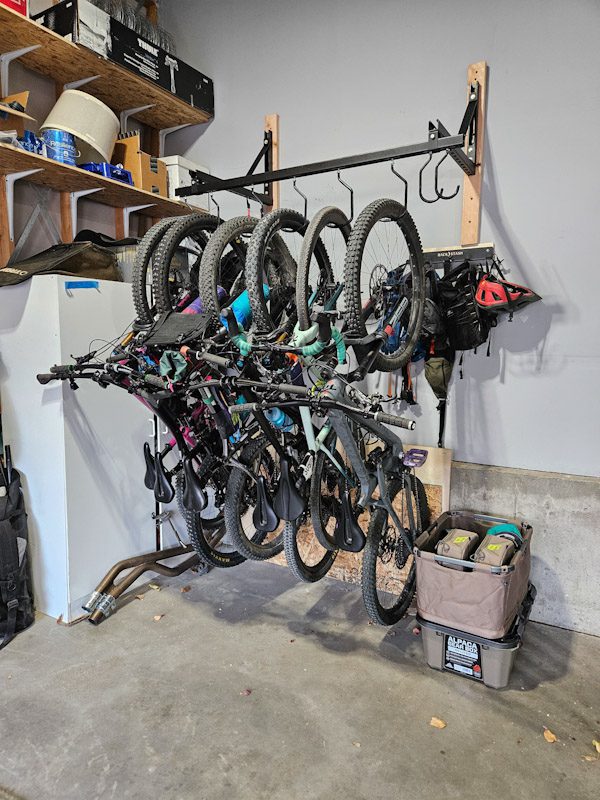
- Rack is 5 feet wide and fits up to 6 bikes and a total of 300 pounds (50 pounds) per hook)
- System is made from powder coated steel that mounts directly into your ceiling (RS Slide) or can fit onto a vertical wall with the RS Slide Mount Wall Adapter.
- Comes with 4 side trolleys and you can buy additional trolleys (either standard or a wider hook that will fit fat bike tires)
- RS Multi Hook secures against the wall and includes 5 staging hooks for pack and helmet storage.
Our garage reorganization took 2 days (which also included cleaning out the garage and reorganizing everything). We spend a decent amount of time trying to decide on the best spot to put the rack. Factors that needed to be considered:
- Wall height – we needed about 8 feet of wall space to accommodate the rack + bikes
- Location of wall studs for mounting the rack – this is critical as you’re hanging up to 300 lbs and thousands of dollars in bikes
- Ease of access – the rack needed to be placed where we could easily get to the bikes to actually use them

We chose a corner of the garage by the stairs for our build. Both my husband and myself have engineering degrees and he does a fair amount of work on cars and bikes (meaning we are both pretty handy and capable). This build wasn’t hard…. But it also wasn’t easy. The installation directions were pretty basic – and I felt that they could have included more detail. Our main gripe with the installation recommendations is that the instructions had you securing bolts with Nylock nuts to the rack while it was attached to the wall 7+ feet in the air. The bolt + nut system required use of two hands (one with a wrench to hold the nut, one to screw the bolt into place with a socket wrench…. All while standing on ladder over 4 feet in the air. And the Nylock nuts required quite a bit of oomph, so one of us had to hold the ladder while the other one did the work. Additionally, since you were working at a wonky angle, it was hard not to cross-thread the bolts (we had to grind 2 sets apart because they seized up, which then meant a hardware trip to replace the parts we broke). Several of these bolts (and the trolleys) could have been put on the rack system while it was still on the ground, which would allow for a safer installation and also would have avoided cross-threading and then destroying key nuts and bolts. Having a few spare Nylock nuts in the installation kit would have also been really nice.
My other quibble is with the required rack mounting width of 48 inches. Because of the weight, you really need to secure the rack into wall studs. And as luck would have it, our studs were either 46 inches apart of 50 inches apart… not 48 inches apart. I imagine we aren’t the only ones out there with stud spacing like this. After some debate (and me running some loose calculations in my engineering brain), we decided to go with the 50 inch spacing, mostly because that’s where we installed it. Having a range of acceptable mounting widths for the wall adapter arms would be really nice to include in the directions.
Otherwise, the installation went pretty smooth. Once attached to the wall, placing the trolley siders on the RS Slider tray was easy, as was loading our bikes. The directions said to alternate bikes (bike 1 hangs by the front wheel, bike 2 hangs by the rear wheel) but due to space limitations, we had to eventually hang everything by the front wheel. Fortunately, we have a wide range of bikes, so the handlebars managed to all puzzle together. The RS Slide (when hanging on the RS Wall Mount) sticks out a few feet, providing space for additional storage. We utilized this extra space to hang spare tires (with a bungee) and the RS Multi Hook fits nicely on the end, giving us easy access for helmets and hydration packs while not interfering with the hanging bikes.

Hanging and removing bikes is very simple. We have 6 bikes hanging, a variety of mountain, fat, and gravel bikes. The trolleys easily slide across the tray with a downward tug as you slide it; when you release the trolley it locks into place. The hooks rotate, so you can either hang your bikes perpendicular to the wall, or hang them at an angle. The trolleys slide nicely when the bikes are hanging from them, making moving bikes as easy as moving coat hangers in a closet.
The 1Up system is also really nice quality. The rack system is all powder coated steel, which just looks nice.

Final Thoughts
The 1UP RS Slide bike hanging system is a very high quality system, that both functions well and looks good. Installation was at a 6/10 (10 being very easy, 1 being very hard), mainly because we were doing detailed work at weird, elevated angles. And even with being careful, we still cross-threaded 2 bolts/nuts and had to grind them off and replace them. Usability is at a 9/10: it’s easy to hang and move the bikes and the RS Storage system allows for modular storage (different bikes, ability to hang things off the wall mount and use complimentary products to organize gear). Overall, we are happy with how or bike reorganization project turned out and were excited to reclaim some garage floor space.
Erin Trail

Erin is a former Montana park ranger with a degree in environmental engineering. She loves getting into technical details while putting her gear (and herself) through the paces. She shares her home in Colorado with her husband, Will, and her 3 cats (Zipper, Brewtus, and Simcoe).


Leave a Reply